Key Sub-System: Textures
Many astronomical objects, especially nebulas have filaments with random structures. This can be simulated with procedural 3-D textures. In Shape procedural textures can be applied to physical quantities such as density, temperature, velocity, etc. These textures are multiplied on top of the spatial variation given by the Magnitude of a quantity.
Open the Texture Parameter Panel by clicking on the Edit button beside the Texture label in the parameter panel of a selected modifier.
Getting the right texture may require quite a bit of experimentation, often combining several basic textures.

Texture Parameter Panel
The Texture Parameter Panel has several sections. At the top-left is the preview window, where a single slice from the x-y coordinate plane of the 3-D texture is shown. A list of combined basic textures is below the preview window and various types of parameters are at the top-right. Transformation modifiers can be added at the bottom-right.
Basic Workflow
Initially the texture editor is blank. A new texture is added from a list of different types after clicking on the Add button to the right of the Textures List. The most commonly used type is the Space Convolution noise.
Now a preview of the texture is generated using the default parameters. To get the texture that is needed change the parameters until a suitable result is obtained.
More than one texture may be combined by adding further textures to the list. Note that the combination is done in the form of a multiplication of the texture values in the range (0-1). Therefore, the more textures you combine, locally the result becomes smaller and smaller.
In the modifiers area, rotation and translation modifiers can be applied that are similar to the corresponding image modifiers applied in the Render Module. This is not descussed in more detail in this section.

Textures Panel
Add: Opens a dialog with a list of different types of procedural noise from which to choose. When you click on OK, the new texture is included in the list of already chosen textures.
Del: Deletes the selected texture from the list.
Up & Down: Move the selected texture up or down in the list.
Copy & Paste: Copy stores the selected texture in a buffer.
Paste pastes the copied texture as a new texture to the list.
Note: As mentioned above, if there is more than one texture they are combined as a local product of their values, which range in the interval (1,0). Moving the textures up and down in the list does not change the result since multiplication is a commutative operation. However, if you explicitly name the textures, the sequence may help at keeping order

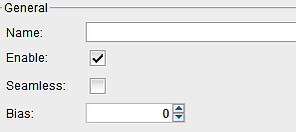
General:
Name: Set a name for this texture
Enable: Enable or disable this texture
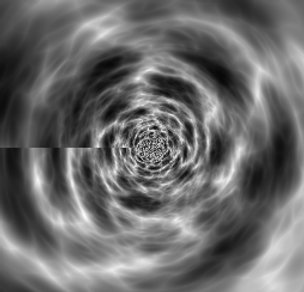
Seamless: This parameter works together with the Distortion (see below). If a Distortion is applied that stretches the texture along the angle in a cylindrical coordinate system, a discontinuity appears at the 0 to 360 degrees transition. To prevent this enable the Seamless flag. An attempt is then made to generate a seamless texture by copying and rotating the same texture by 180 degrees and overlapping the two with a linear transition between the two that excludes the seam region.
Currently, the result is a seamless texture that has a 180 degrees point symmetry.
Bias: Sets a minimum intensity for the texture. If b is the bias level, now the range for the texture is (b,1).

Properties:
The detailed parameters for different types of textures vary. Here we discuss the example of Sparse Convolution Noise, which is the most suitable for most filamentary features in diverse nebular objects.
Many of the parameters are common to all textures, others will differ. But a bit of experimentation will clarify the meaning of the differing parameters.
Sparse Convolution Noise:
Scale: The scale of the texture can be set separately in the three coordinate directions. By default they are looked together, i.e. when you change one of them, the other two automatically get the same value. They can be unlocked by unchecking the Lock flag. Then the values can be set independently.
To asses the size of the features in the context of the model domain note that the preview window has the same size as the scene size in the Render Module.
X Y Z Offset: These parameters move the texture along the corresponding axis. The units are those of the Render Module.
Exponent: Controls the contrast between the highest and lowest levels of brightness. High values deemphasize initially lower values.
Freq: The levels of spatial frequencies to be included in the random noise generation. Higher values will include smaller features.
Type 2: This type generates a different look and overall smaller structures.
Invert: inverts the greyscale, the interval (0,1) is linearly mapped to (1,0).


Image Size: Sets the pixel size of the texture preview image.
Z slice: Selects the slice to be shown in the preview. Changing the value moves the preview through the cube of slices along the line of sight.
Distortion: This button opens a dialog that controls the re-mapping of the noise as a function of position. Analytical expressions can be set up to remap the noise in different coordinate systems. This allows the user to stretch the noise pattern in radial or circular directions.
There is an example for such a distorted texture on the right. The second image is the same texture after applying the Seamless flag (see above).
Below is the dialog that opens when you click on the Distortion button. It is similar to other Graphs. Make sure to set the correct coordinate system for the distortion to be applied. The example uses the Cylindrical Coordinate system and distorts the radial and the angular directions. Some experimentation with the analytic expression or point graph is likely needed to get the desired result.


